
Introduction
This installation guide describes how to install and configure the DocTrails Connector in order to
exchange EDI files with Zevij-Necomij. This software is free of use and is developed by our software company D Soft NV.
Download software
The free DocTrails Connector software can be dowloaded here.
Installation of the software
NOTE: The software should be installed on your server under an account with Administrator
rights. The software runs as a service, so changing your Administrator password will effect the
service. Please make sure you got .NET FRAMEWORK 2.0 and 3.5 installed on your server.
Step 1:
Open the setup.exe and click on Next on the first screen of the installation wizard.
Step 2:
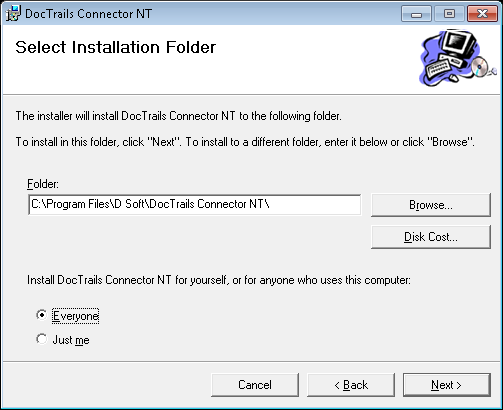
Select Everyone for the installation and click Next, also on the next screen. The installation will
then start.
Step 3:
During the installation a login screen will appear. Please fill in your user credentials. These should
be the same as your current login with Administrator rights. Please also include the domain
name you are working in, in front of your username. If you are not working in a domain, replace
the domain name with a dot.
Examples:
yourdomain\username
.\username
The installation should finish correctly now.
Configuring the software
To configure the software open the configuration tool through the START menu. The program is
called DSoft DocTrails Connector NT. When the program opens click the START button to start
the service. If you get an error trying to start the service with this button, please go to Services
on your server and start the service from there. It’s called DocTrailsNTConnectorService.
After you clicked on START the program will load the server settings and platforms. On the tab
Flows you will find login fields on the subtab Toevoegen Platform which you need to fill in. These
login credentials will be provided to you by Zevij-Necomij’s IT department.

Once you entered the login credentials, the program will load your specific settings and
platforms needed to exchange EDI files. A new tab should appear called Zevij-Necomij. On this
tab the incoming and outgoing flows are configured.
On this tab you should see some incoming and/or outgoing flows. To configure the folder, where
the files should be placed or retrieved from, click on the folder icon. Select the correct folder and
press OK. The file path should now be displayed. Press the red square in order to activate the
flow. The red square changes into a green triangle. The flow is now active.

Other settings
The software has some other settings and features. First of all is the process interval. By default
this is set on 600 seconds. You can change this to any value above 60 seconds. You can also
schedule the processing to a certain time frame of the day.
On the tab Logging any errors will be displayed. On the tab Historiek you can find a log of all
exchanged files.
If by any chance you do not see any flows or tabs, please click on Vernieuwen Flows.
Issues
If you have any issues with the installation or configuration of the software, please contact our IT
department.
Opmerkingen
0 opmerkingen
U moet u aanmelden om een opmerking te plaatsen.